Empower Your Database Security: Creating a Postgres Read-Only User with Terraform

Introduction :-
In this guide, we will walk you through the process of creating a read-only user for a #PostgreSQL database using #Terraform. By following this step-by-step tutorial, you will be able to leverage Terraform’s #infrastructure-as-code capabilities to provision and manage your #PostgreSQL database resources, while ensuring the #security and access control of your data.
Prerequisites: To follow along with this tutorial, you will need the following:-
An AWS account with appropriate permissions to create resources like Ec2 Instances, RDS instances, and #Terraform access.
#Terraform installed on your local machine.
Basic knowledge of #PostgreSQL and #AWS RDS (Relational Database Service).
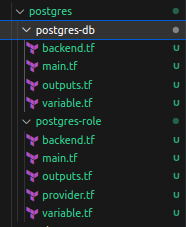
Step 1 :- Create a folder named postgres in your home directory and with in the postgres folder create two more folders with name postgres-db and postgres-role as shown below.
Step 2 :- Now create a RDS instance and Bastion-host instance within the postgre-db folder main.tf file using terraform.(Refer Below code)
resource "random_password" "db_master_password" {
  length  = 16
  special = false
}

resource "random_password" "db_read_only_password" {
  length  = 16
  special = false
}

resource "aws_secretsmanager_secret" "postgres_db" {
  name = var.secret_name
  recovery_window_in_days = 0
}

resource "aws_secretsmanager_secret_version" "postgres_db" {
  secret_id     = aws_secretsmanager_secret.postgres_db.id
  secret_string = <<EOT
{
  "master_username": "${var.db_username}",
  "master_password": "${random_password.db_master_password.result}",
  "read_only_username": "${var.db_username}_db",
  "read_only_password": "${random_password.db_read_only_password.result}",
}
EOT
}

resource "aws_vpc" "default" {
  cidr_block = var.vpc_cidr_block
  tags = {
    Name = "${var.vpc_name}"
  }
}

resource "aws_subnet" "public_subnet" {
  count                   = var.count_index
  vpc_id                  = aws_vpc.default.id
  cidr_block              = var.public_subnet_cidr_blocks[count.index]
  availability_zone       = var.azs[count.index]
  tags = {
    Name = "Public Subnet"
  }
}

resource "aws_subnet" "db_subnet" {
  count             = var.count_index
  vpc_id            = aws_vpc.default.id
  cidr_block        = var.db_subnets_cidr_blocks[count.index]
  availability_zone = var.azs[count.index]  # Replace with your desired availability zone
  tags = {
    Name = "Database Subnets"
  }
}

# Create Internet Gateway
resource "aws_internet_gateway" "igw" {
  vpc_id = aws_vpc.default.id

  tags = {
    Name = "postgres IGW"
  }
}

# Create Web layber route table
resource "aws_route_table" "web-rt" {
  vpc_id = aws_vpc.default.id
  route {
    cidr_block = "0.0.0.0/0"
    gateway_id = aws_internet_gateway.igw.id
  }
  tags = {
    Name = "WebRT"
  }
}

resource "aws_security_group" "allow_all" {
  name   = "sg_for_rds"
  vpc_id = aws_vpc.default.id
  description = "RDS instance security group"
  ingress {
    description = "All Traffic"
    from_port   = 5432
    to_port     = 5432
    protocol    = "tcp"
    cidr_blocks = [var.public_subnet_cidr_blocks[0],
    var.public_subnet_cidr_blocks[1],
    var.public_subnet_cidr_blocks[2],
    var.db_subnets_cidr_blocks[0],
    var.db_subnets_cidr_blocks[1],
    var.db_subnets_cidr_blocks[2]]
  }

  egress {
    from_port   = 0
    to_port     = 0
    protocol    = "-1"
    cidr_blocks = ["0.0.0.0/0"]
  }
  tags = {
    Name        = "allow_all"
  }
}
resource "aws_db_instance" "postgres_rds" {
  allocated_storage    = var.allocated_storage
  identifier           = var.identifier
  storage_type         = var.storage_type
  engine               = var.engine
  engine_version       = var.engine_version
  instance_class       = var.instance_class
  db_name              = var.db_name
  username             = var.db_username
  password             = random_password.db_read_only_password.result
  parameter_group_name = var.parameter_group_name
  db_subnet_group_name = aws_db_subnet_group.db-subnet.name
  skip_final_snapshot = true
}

resource "aws_db_subnet_group" "db-subnet" {
  name = var.db_subnet_group_name
  subnet_ids  = [
   aws_subnet.db_subnet[0].id,
   aws_subnet.db_subnet[1].id,
   aws_subnet.db_subnet[2].id
  ]
}

data "http" "my_ip" {
  url = "http://checkip.amazonaws.com/"
}

resource "aws_iam_role" "bastion_role" {
  name               = "bastion-role"
  assume_role_policy = jsonencode({
    Version = "2012-10-17"
    Statement = [
      {
        Action = "sts:AssumeRole"
        Effect = "Allow"
        Sid    = ""
        Principal = {
          Service = "ec2.amazonaws.com"
        }
      },
    ]
  })
}

resource "aws_security_group" "sg-bastion-host" {
  name        = "sg_for_bastion-host"
  description = "security group for bastion host"
  vpc_id      = aws_vpc.default.id

ingress {
    description = "ssh"
    from_port   = 22
    to_port     = 22
    protocol    = "tcp"
    cidr_blocks = ["${chomp(data.http.my_ip.body)}/32"]
  }

  egress {
    from_port        = 0
    to_port          = 0
    protocol         = "-1"
    cidr_blocks      = ["0.0.0.0/0"]
  }

  tags = {
    Name          = "sg_for_bastion"

  }
}
resource "aws_iam_instance_profile" "iam_profile" {
  name = "bastion-profile"
  role = aws_iam_role.bastion_role.name
}

resource "aws_instance" "bastion_host" {
  ami                    = var.ami_id
  instance_type          = var.instance_type
  vpc_security_group_ids = [aws_security_group.sg-bastion-host.id]
  key_name               = aws_key_pair.bastion-key.key_name
  iam_instance_profile    = aws_iam_instance_profile.iam_profile.id
  subnet_id               = aws_subnet.public_subnet[0].id
  tags = {
    Name = "bastion-host"
  }
}

resource "tls_private_key" "this" {
  algorithm = "RSA"
}

resource "aws_key_pair" "bastion-key" {
  key_name   = var.key_name
  public_key = tls_private_key.this.public_key_openssh

  provisioner "local-exec" { # Create a "myKey.pem" to your computer!!
    command = "echo '${tls_private_key.this.private_key_pem}' > ~/${var.key_name}.pem"
  }
}
variable "identifier" {
  default = "postgres-rds-db"
}
variable "allocated_storage" {
  default = 20
}
variable "storage_type" {
 default = "gp2"
}
variable "engine" {
  default = "postgres"
}
variable "engine_version" {
  default = 14.7
}
variable "instance_class" {
  default = "db.t3.micro"
}
variable "db_name" {
  default = "postgres_db"
}
variable "parameter_group_name" {
  default = "default.postgres14"
}

variable "public_subnet_cidr_blocks" {
  type    = list(string)
  default = ["10.50.0.0/24", "10.50.1.0/24", "10.50.2.0/24"]
}

variable "db_subnets_cidr_blocks" {
  type    = list(string)
  default = ["10.50.16.0/24", "10.50.32.0/24", "10.50.64.0/24"]
}

variable "vpc_cidr_block" {
  description = "CIDR block for VPC"
  default     = "10.50.0.0/16"
}

variable "vpc_name" {
  description = "Name of the VPC"
  default     = "open-source_projects"
}

variable "azs" {
  type    = list(string)
  default = ["us-east-1a", "us-east-1b", "us-east-1c"]
}

variable "count_index" {
  type = number
  default = 3
}

variable "db_subnet_group_name" {
  type = string
  default = "db-subnet-group"
}

variable "secret_name" {
  type = string
  default = "Open-source"
}

variable "key_name" {
  type = string
  default = "postgres-key"
}

variable "ami_id" {
  type = string
  default = "ami-06ca3ca175f37dd66"
}

variable "instance_type" {
  type = string
  default = "t2.micro"
}

variable "db_username" {
  type = string
  default = "read_only_user"
}

variable "subnet_count" {
  type = number
  default = 1
}
Step 3:- Deploy the above code to create a postgre-db.
Step 4:- Next create a main.tf and variable.tf , provider.tf files in the postgres-role directory to create a db-read-only-user using terraform
Step 5:- Refer the below code to Create the postgres user and role .
# main.tf
provider "postgresql" {
  host            = "127.0.0.1"
  port            = "5434"
  database        = "postgres"
  username        = "${var.db_username}"
  password        = "${var.db_master_password}"
  sslmode         = "require"
  connect_timeout = 15
  superuser = false
}

resource "postgresql_role" "readonly" {
  name = "readonly"
}

resource postgresql_grant "readonly_public" {
  database    = "postgres"
  role        = postgresql_role.readonly.name
  schema      = "public"
  object_type = "table"
  privileges  = ["SELECT"]
}

resource "postgresql_role" "readonly_user" {
  name     = "${var.db_username}-db-role"
  password = "${var.db_read_only_password}"
  login    = true
  roles = [postgresql_role.readonly.name]
}
# variables.tf
variable "db_username" {
  type = string
  default = "read_only_user"
}

variable "secret_name" {
  type = string
  default = "Open-source"
}

# Note:- Login to aws management console, then navigate to secrets manager service and find the Open-source secret. Retrieve the secret values in Open-source secret to copy the master_password & db_read_only_password.
variable "db_master_password" {
  type = string
  description = "The master pasword of the postgres-db"
  default = "GJpdsI2IhnAaMWaZ"
}

variable "db_read_only_password" {
  type = string
  description = "read only password of the postgres-db"
  default = "myn1JubEHNTeZ9ju"
}
# provider.tf
terraform {
  required_providers {
    postgresql = {
      source = "cyrilgdn/postgresql"
      version = "1.19.0"
    }
    aws = {
      source = "hashicorp/aws"
      version = "5.8.0"
    }
  }
}
Step 6:- First we need to run the tunneling command to #deploy the above postgres read only user creation code. Tunneling command will looks like below.
Step 7 :- Replace the below command values with your postgres-db and instance values. After replacing the values Open a terminal window and run the command.
ssh -i <.pem> -f -N -L 5434:<db-endponit>:5432 ec2-user@<bastion-host-public ip> -v
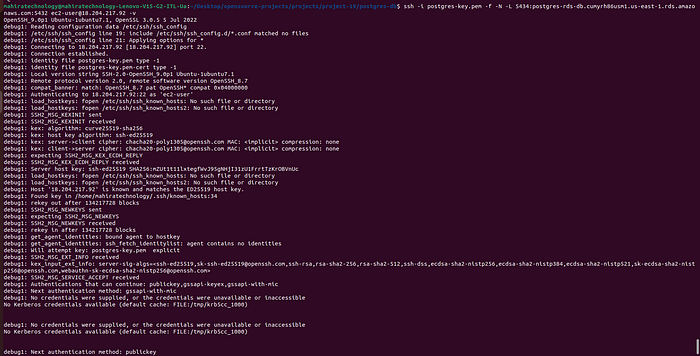
Step 8:- Keep the tunneling running on and open another terminal to deploy the postgres read only user code.
Step 9:- Once the code deploy’s successfully. Connect to your #pgadmin4 and check the user and role is being created or not. To connect to your pgadmin refer the below figure
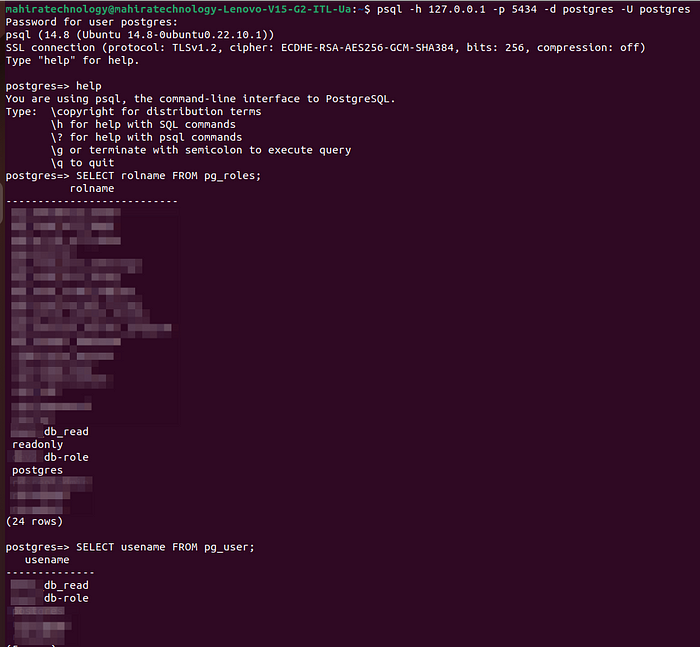
Step 9 :- As u can see the read-only-user and role is being created in postgres db (or) else u can verify by downloading the pgadmin4 and connecting to the db
Step 10 :- once u have connected with Desktop #PGadmin4. First register u r credentials in pgadmin4. as shown like below
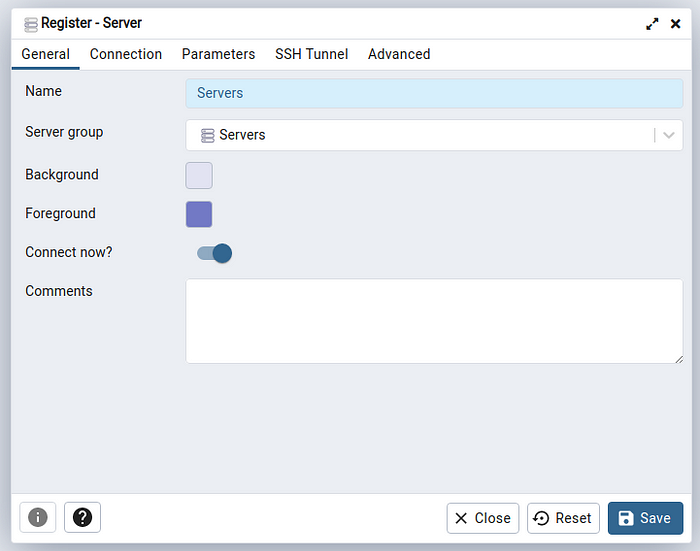
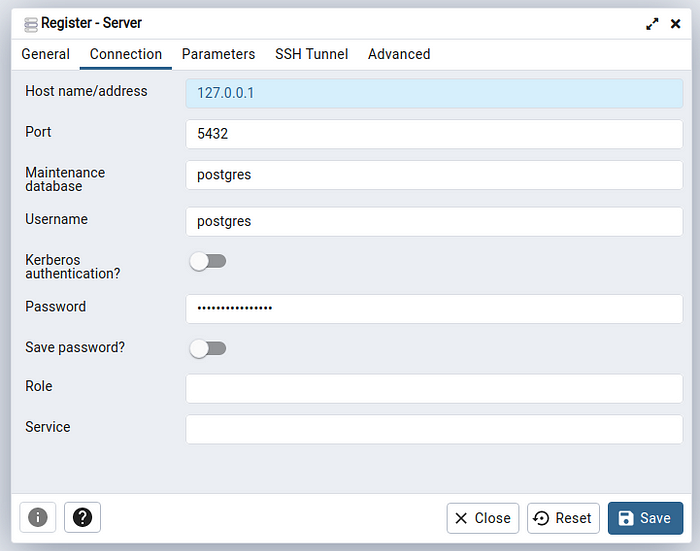
Step 11 :- after filling the db details, click on save to login to the #PgAdmin4.
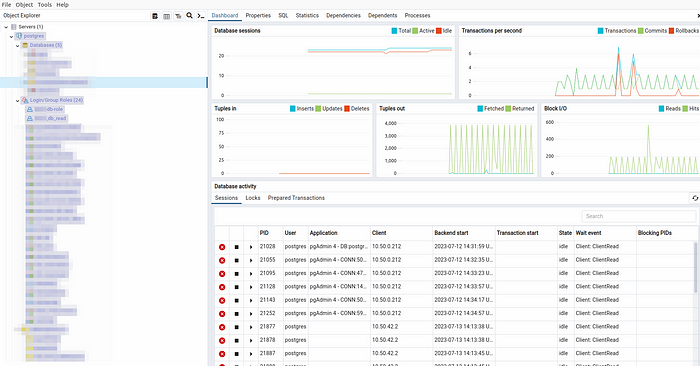
Step 12 :- Once u registered the postgresdb. You are able to see the read-only-user in the postgresdb, as shown in below .
Conclusion :-
In this guide, we have demonstrated how to create a read-only user for a #PostgreSQL database using #Terraform. By following the step-by-step tutorial, users can leverage Terraform’s #infrastructure-as-code capabilities to provision and manage PostgreSQL database resources while ensuring data #security and access control.
The process involves creating an RDS instance, a bastion host, and the necessary security groups. Then, we use Terraform to create a read-only user, a role, and grant the necessary privileges to the user on the public schema of the PostgreSQL database.
By using #infrastructure as code, we can easily reproduce this setup across multiple environments with consistent configuration and #security. #Terraform allows us to version-control our infrastructure code, making it easier to track changes and #collaborate with a team.
