Step-by-Step Success: Creating Domain Identities in Amazon SES for Beginners

Overview :-
Hello there! If you’ve decided to dabble in the world of email marketing or simply wish to improve how your business communicates, you’ve probably heard about Amazon Simple Email Service (SES). It’s a robust, flexible tool for managing emails, but before you dive into crafting those eye-catching emails, there’s an essential first step — creating and verifying your domain identity on Amazon SES. This might sound a bit technical, but worry not! We’re going to walk through this process together, step by step, making sure that by the end of this guide, you’ll feel ready to tackle it on your own.
Prerequisites :-
Before we get our hands dirty, let’s make sure you’re all set with the necessary tools and access:
An AWS account: You’ll need to have access to an Amazon Web Services account. If you don’t have one, you can easily sign up for it on their website.
Domain Name: Obviously, you’ll need a domain name that you wish to send emails from. This can be something like ‘mahiratechnology.com’.
Access to Domain DNS Settings: You need the ability to modify your domain’s DNS settings because you’ll be adding some important records that verify your ownership of the domain.
Procedure :-
Step 1: Open the Amazon SES Console
Login to your Aws management console and navigate to “ses” service.
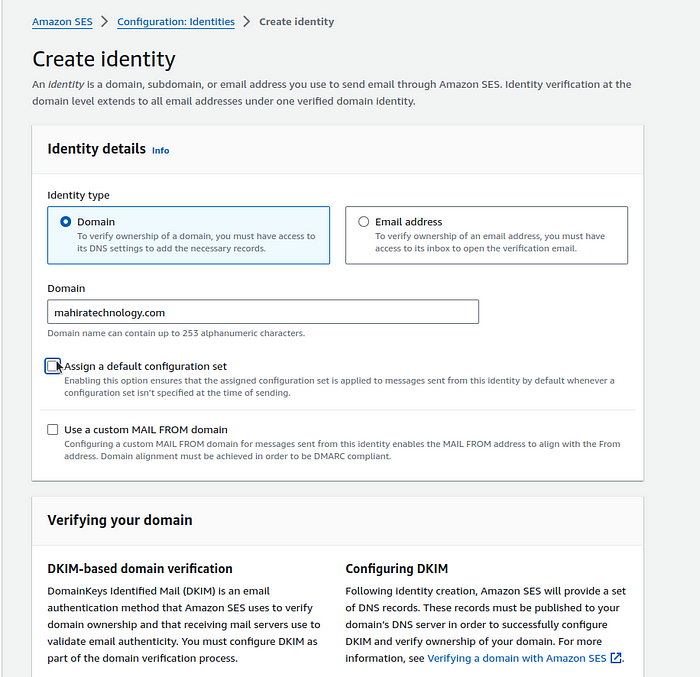
Click on create Identity and give a name for your domain and click on create identity


Step 2: Verify a New Domain
- Add the configuration sets if required, and verify your domain with Easy DKIM and the signing key as “RSA_2048_BIT”.
Step 3: Add DNS Records to Your Domain
- After creating the identity, Publish the DNS records to your hosted zone.
Step 4: Wait for the Verification
Once you’ve added the DNS records, go back to your Amazon SES console and click the ‘Verify this domain’ button. Verification might take some time (typically up to 72 hours), so a little patience here goes a long way.

Conclusion :-
Congratulations! You’re all set up with your domain identity in Amazon SES. Wasn’t that bad, right? With your domain now verified, you’re ready to send emails that truly represent your brand, boosting credibility and ensuring your emails actually land in those inboxes. Dive into these settings, play around with what you’ve learned today, and remember, each small step in mastering tools like Amazon SES brings you closer to being an email wizard. Happy emailing, and never hesitate to run a test email campaign to see how your newly verified domain holds up!
