Amazon Simple Notification Service (SNS) topic creation Using CloudFormation

Introduction :-
Amazon Simple Notification Service (SNS) is a fully managed messaging service provided by #Amazon Web Services (AWS) that enables you to send messages or notifications to a distributed set of recipients through various delivery protocols, including SMS, email, and more.
Creating an #Amazon Simple Notification Service (SNS) topic and its associated subscriptions based on the selected environment can be done programmatically using #AWS CloudFormation as demonstrated in your provided #CloudFormation template.
Prerequisites:-
You need an AWS account with appropriate permissions to create SNS topics and subscriptions.
You should have identified the environments (e.g., dev, staging, uat, production) and the corresponding SQS queues and email addresses to use as subscriptions.
- Log in to the #AWS Management Console: Ensure that you are logged in to your AWS account and have the necessary permissions to create #CloudFormation stacks.
2. Access AWS CloudFormation: Go to the AWS CloudFormation console by searching for “CloudFormation” in the #AWS Management Console’s search bar or by navigating to the “Management & Governance” section.
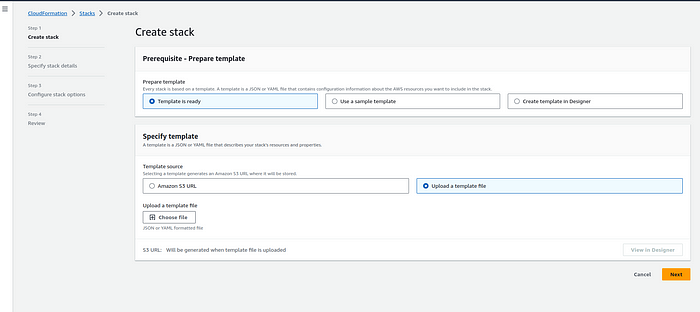
3. Create a New Stack: Click on the “Create stack” button to start the stack creation process.
4. Select Template: In the “Choose a template” section, select the “Upload a template file” option and then click on “Choose file.” Upload the CloudFormation template file you provided (or paste its contents) and click “Next.”

Specify Stack Details: You will be prompted to specify the stack details:
Stack name: Provide a unique name for your CloudFormation stack.
EnvironmentName: Enter the desired environment name (e.g., dev, staging, uat, production).
QueueStackName: Enter the name of an active CloudFormation stack of SQS resources.
AlarmMonitorEmail: Enter the email address where alarms will be sent.
Click “Next” to proceed.
SNS.yaml :
AWSTemplateFormatVersion: 2010–09–09
Description: AWS CloudFormation Template for the SNS Queues and subscriptions.
Parameters:
 EnvironmentName:
 Description: Environment name for the application dev/staging/uat/production
 Type: String
 AllowedValues:
   - dev
   - production
 ConstraintDescription: Specify either dev or staging or uat or production
 QueueStackName:
 Description: Name of an active CloudFormation stack of SQS resources
 Type: String
 MinLength: 1
 MaxLength: 255
 AllowedPattern: '^[a-zA-Z][-a-zA-Z0–9]*$'
 AlarmMonitorEmail:
 Description: Email address where alarms will be send
 Type: String
Mappings: {}
Conditions:
 PublishToDevAndStagingQueues: !Or
 - !Equals
 - !Ref EnvironmentName
 - dev
 - !Equals
 - !Ref EnvironmentName
 - staging
 PublishToQueueInSameEnv: !Or
 - !Equals
 - !Ref EnvironmentName
 - uat
 - !Equals
 - !Ref EnvironmentName
 - production
Resources:
 SNSTopic:
 Condition: PublishToQueueInSameEnv
 Type: 'AWS::SNS::Topic'
 Properties:
 TopicName: !Sub '${EnvironmentName}-topic-name'
 KmsMasterKeyId: alias/aws/sns
 Subscription:
 - Endpoint: !ImportValue
 'Fn::Sub': '${QueueStackName}-Subscription'
 Protocol: sqs
 MonitoringAlarmsSNSTopic:
 Type: 'AWS::SNS::Topic'
 Properties:
 KmsMasterKeyId: alias/aws/sns
 Subscription:
 - Endpoint: !Ref AlarmMonitorEmail
 Protocol: email
Outputs:
 Name:
 Description: SNS Stack name
 Value: !Ref 'AWS::StackName'
 Export:
 Name: !Sub '${AWS::StackName}-Name'
 SNSTopicArn:
 Condition: PublishToQueueInSameEnv
 Description: SNS Topic
 Value: !Ref SNSTopic
 Export:
 Name: !Sub '${AWS::StackName}-SNSTopicArn'
 MonitoringAlarmsSNSTopicArn:
 Description: Alarms goes to SNS Topic
 Value: !Ref MonitoringAlarmsSNSTopic
 Export:
 Name: !Sub '${AWS::StackName}-MonitoringAlarmsSNSTopicArn'
5. Configure Stack Options: You can skip this step for now and click “Next.”
6. Review: Review the stack details and make sure everything is correct. You will see a summary of the parameters you provided. If everything looks good, click the “Create stack” button at the bottom of the page.
7. Monitor Stack Creation: AWS CloudFormation will now create the stack and its resources based on the provided template. You can monitor the progress in the CloudFormation console.
8. Stack Creation Completion: Wait for the stack to complete creation. Once the stack’s status changes to “CREATE_COMPLETE,” it means that the SNS topic and its associated resources have been created successfully.
9. Access Stack Outputs: After the stack creation is complete, you can access the stack outputs, including the exported values:
Name: The CloudFormation stack's name.SNSTopicArn: The ARN of the SNS topic (if thePublishToQueueInSameEnvcondition is met).
10. Clean Up (Optional): If you no longer need the stack or its resources, you can delete the CloudFormation stack by selecting it in the AWS CloudFormation console and choosing “Delete stack” from the actions menu.
That’s it! You have successfully created an #AWS CloudFormation stack using the provided template, which sets up an SNS topic and its associated subscriptions based on the selected environment and other parameters.
Conclusion :-
#**Amazon SNS combined with #AWS CloudFormation simplifies the process of creating and managing messaging topics in a scalable and repeatable manner. This approach enhances the reliability and maintainability of your AWS-based applications that rely on messaging for communication and notification purposes.
