
Deploy Hashicorp Vault to store Keys and KES for encryption with Minio for object storage using Helm package manager


The Vault’s #Key Management secrets engine provides a consistent workflow for distribution and lifecycle management of cryptographic keys in various #key management service (KMS) providers. It allows organizations to maintain centralized control of their keys in Vault while still taking advantage of cryptographic capabilities native to the #KMS providers.
You’ll need kubernetes cluster deployed using the kubeadm utility for this procedure;
1. First ssh to master host using below command.
ssh -i <rsa_key> <master_server_user_name>@<master_server_ip_address>
2. After successfully logging in to #kubernetes master server. run below command to get #kubernetes node1 node name.
kubectl get node | grep node1 | awk ‘{print $1}’
3. After collected #kubernetes node1 name. Run below Command for assign node label for node1.
kubectl label nodes <node1_name> storagetype=local
4. For confirming the node1 has assigned label run below command.
kubectl get nodes — show-labels | grep storagetype
5. After label added to node1 login into the node1 server and create directories using below command.
· mkdir /vault-data (data directory for vault)
· mkdir -p /mnt/disk1/data ( data directory for minio )
6. After data directories created login in master node server and create “minio” namespace using below command.
kubectl create namespace minio
7. After the namespace is created, deploy the storage driver, vault-pv(persistence volume) and vault-pvc(Persistence Volume Claim) using shared yaml files.
8. After SC (Storage Class), PV and PVC created deploy vault using vault-helm folder with values1.yaml without SSL enabled using below command.
cd vault-helm
helm install vault . -f values1.yaml -n minio (install helm and apply the values.yml)
KES
KES is a stateless and distributed key-management system for high-performance applications. It is designed to be run inside #Kubernetes and distribute cryptographic keys to applications. To be clear, KES cannot and does not try to replace a full-featured KMS. Instead, it acts as a bridge between a central KMS and cloud-native applications.
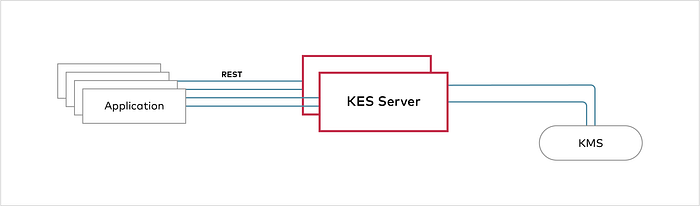
Representation for KES
9. After vault successfully deployed, run below command and store output for kes server deployment.
#Initialise vault
kubectl exec vault-0 -n minio — vault operator init -key-shares=1 -key-threshold=1 -format=json > init-keys-ibm.json
#View the unseal key found in init-keys.json
cat init-keys-ibm.json | jq -r “.unseal_keys_b64[]”
#Create a variable named VAULT_UNSEAL_KEY to capture the Vault unseal key.
VAULT_UNSEAL_KEY=$(cat init-keys-ibm.json | jq -r “.unseal_keys_b64[]”)

#Unseal Vault running on the vault-0 pod with the $VAULT_UNSEAL_KEY.

kubectl exec vault-0 -n minio — vault operator unseal $VAULT_UNSEAL_KEY

#Unseal vault

cat init-keys-ibm.json | jq -r “.unseal_keys_b64[]”

VAULT_UNSEAL_KEY=$(cat init-keys-ibm.json | jq -r “.unseal_keys_b64[]”)

kubectl exec vault-0 -n minio — vault operator unseal $VAULT_UNSEAL_KEY

kubectl exec -it vault-0 sh -n minio

vault login

{

“unseal_keys_b64”: [

“your key”

],

“unseal_keys_hex”: [

“your key”

],

“unseal_shares”: 1,

“unseal_threshold”: 1,

“recovery_keys_b64”: [],

“recovery_keys_hex”: [],

“recovery_keys_shares”: 5,

“recovery_keys_threshold”: 3,

“root_token”: “your token “

}
#Enable the Vault K/V engine. KES version 0.15.0 and later support both the v1 and v2 engines. This procedure uses the v1 engine.
command — vault secrets enable -version=1 kv
#For K/V v1, create an access policy kes-policy.hcl with a configuration similar to the following:
path “kv/*” {

capabilities = [ “create”, “read”, “update”, “delete”, “list”]

}

path “kv/metadata/*” {

capabilities = [ “list”, “delete”]

}

path “auth/approle/*” {

capabilities = [ “create”, “read”, “update”, “delete”, “list” ]

}

#Enable the AppRole auth method:

vault auth enable approle

Success! Enabled approle auth method at: approle/

/ $ vault write auth/approle/role/kes-role token_num_uses=0 secret_id_num_uses=0 period=5m

Success! Data written to: auth/approle/role/kes-role

vault write auth/approle/role/kes-role policies=kes-policy

/ $ vault read auth/approle/role/kes-role/role-id

Key Value

— — — — -

role_id “YourroleID”

/ $

vault write -f auth/approle/role/kes-role/secret-id

Key Value

— — — — -

secret_id “Your Value”

secret_id_accessor “Your Value”

secret_id_ttl 0s
10. After all configuration done enable the SSL for vault using below steps.
· login into node1 server and create tls directory in /vault-data the copy the cert file in server.pem and keyFile to server-key.pem
· then login to master node server and upgrade helm chart with values2.yml using below command (with ssl enabled)
helm upgrade vault . -f values2.yaml -n minio (upgrade your values.yml)

MinIO is a High Performance Object Storage released under GNU Affero General Public License v3.0. It is API compatible with Amazon S3 cloud storage service. Use MinIO to build high performance infrastructure for machine learning, analytics and application data workloads. Standalone MinIO servers are best suited for early development and evaluation. Certain features such as versioning, object locking, and bucket replication require distributed deploying MinIO with Erasure Coding.
After successfully helm upgrade delete existing vault0 pod for loading new configuration using below command.
kubectl delete pod vault0 -n minio
4. After successfully vault0 pod start again access vault using browser and unseal it using unseal key.
#Enable MinIO Server-Side Encryption with Hashicorp Vault
Login on node2 server for Setting up KES server
Prior to starting these steps, create the following folders:
mkdir -p ~/kes/certs ~/kes/config
#Download the MinIO Key Encryption Service
wget https://github.com/minio/kes/releases/download/v0.16.1/kes-linux-amd64 -O /tmp/kes && \
chmod +x /tmp/kes && \
sudo mv /tmp/kes /usr/local/bin
kes — version
#Generate the TLS Private and Public Key for KES
kes tool identity new — server — key /root/kes/certs/server.key — cert /root/kes/certs/server.cert — ip “10.250.128.4” — dns kes-ibm.pixl.ai
#Generate the TLS Private and Public Key for MinIO
kes tool identity new — server — key /root/kes/certs/minio-kes.key — cert /root/kes/certs/minio-kes.cert — ip “10.250.65.5” — dns minio-ibm.pixl.ai
create directory for store vault cert file. using below command.
mkdir -p /root/vault/certs
copy cert file with file name vault-tls.cert in /root/vault/certs
cd ~/kes/certs
#Replace vault-endpoint value with your value in the server-config.yaml.
copy file to /root/kes/config
Run below command for MINIO_IDENTITY_HASH value.
kes tool identity of minio-kes.cert
#Replace value in below environment variable.
export MINIO_IDENTITY_HASH=”Your Hash"
export VAULTAPPID=”Your ID"
export VAULTAPPSECRET=”Your ID"
Now Start kes server using below command in background.
kes server — mlock — config=/root/kes/config/server-config.yaml — auth=off &
#Generate a Cryptographic Key
export KES_SERVER=https://localhost:7373
export KES_CLIENT_KEY=/root/kes/certs/minio-kes.key
export KES_CLIENT_CERT=/root/kes/certs/minio-kes.cert
kes key create -k minio-backend-default-key
Now connect to node 1 server and copy minio-kes.cert, minio-kes.key and server.cert file to /mnt/disk1/data.
add host entry to node1 /etc/hosts file as below for kes server endpoint.
<KES_SERVER_PRIVATE_IP> kes-ibm.pixl.ai
now login into the master server and replace ip value to to KES_SERVER_PRIVATE_IP in minio-deploy.yaml
Then run below command and deploy minio;
kubectl -f apply minio-deploy.yaml
kubectl -f apply minio-svc.yaml
Once the above procedure is done, you are now ready to upload data onto Minio Service which can be encrypted.