Introduction :-
Load balancers play a crucial role in modern cloud architectures, ensuring that traffic is distributed efficiently and reliably to backend services. One often-overlooked configuration parameter is the idle timeout, which determines how long the load balancer will keep a connection open without any data transfer. In this guide, we will explore how to use #Terragrunt, a powerful infrastructure as code (IAC) tool, to update the idle timeout attribute for your #AWS load balancer. By the end, you’ll have better control over your load balancer’s behavior, improving the performance and reliability of your applications.
Pre-requestites :-
Aws account with required permissions.
Aws cli installed on your system.
#Terraform and #Terragrunt should be installed on your local system.
Step-1 :- First Login to your #Aws management console and create a s3 bucket and dynamo-db table to storing the lock files. Next, Create a directory named aws-load-balancer in your home directory with-in the aws-load-balancer directory, create a file named terragrunt.hcl. Update the s3 bucket name and dynamo db table name in the main terragrunt.hcl file as shown below.
remote_state {
  backend = "s3"
  config = {
    bucket         = "YOUR-TERRAGRUNT-S3-BUCKET-NAME"
    key            = "${path_relative_to_include()}/terraform.tfstate"
    region         = "us-east-1"
    encrypt        = true
    dynamodb_table = "YOUR-DYNAMODB-TABLE"
  }
 generate = {
    path      = "backend.tf"
    if_exists = "overwrite_terragrunt"
  }
}
Step-2 :- within the load-balancer directory create one more folder named idle_time-out. Create terragrunt configuration file (terragrunt.hcl) in your idle_time-out folder.
Step-3 :- Open the terragrunt.hcl file using visual editor and paste the below code into the file.
terraform {
  source = "tfr:///terraform-aws-modules/alb/aws?version=8.1.0"
}

locals {
  region            = "us-east-1"
  backend_protocol   = "HTTP"
  backend_port       = "80"
  target_type        = "instance"
  vpc_id             = "vpc-090ub544j64i333"
  subnet_ids         = ["subnet-hb5j5j6kh2344", "subnet-88u8n798s8f89", "subnet-8878hhjgvjh89"]
  security_group_id  = ["sg-0977950bec1cfefd6"]
}

inputs = {
  name               = "Mahira-alb"
  load_balancer_type = "application"
  vpc_id             = local.vpc_id
  subnets            = [local.subnet_ids]
  security_groups    = [local.security_group_id]
  idle_timeout       = 4000

  target_groups = [
    {
      name              = "alb-tg"
      backend_protocol = local.backend_protocol
      backend_port     = local.backend_port
      target_type      = local.target_type
      health_check = {
        enabled             = true
        interval            = 30
        path                = "/health.html"
        port                = "traffic-port"
        healthy_threshold   = 3
        unhealthy_threshold = 3
        timeout             = 6
        protocol            = "HTTP"
        matcher             = "200-399"
      }
    }
  ]
}
Step-4 :- Replace the vpc_id,subnet_ids and security_groups with your values.
Step-5 :- Open a command prompt or terminal window and locate to your aws-load-balancer directory .
Step-6 :- Now configure your aws credentials and run terragrunt commands.
terragrunt init
- Once the initialization is done , Run terragrunt apply command to deploy your load balancer configuration.
terragrunt apply
Step-7 :- After the deployment is done, Go a head and Login to your #AWS Management Console.
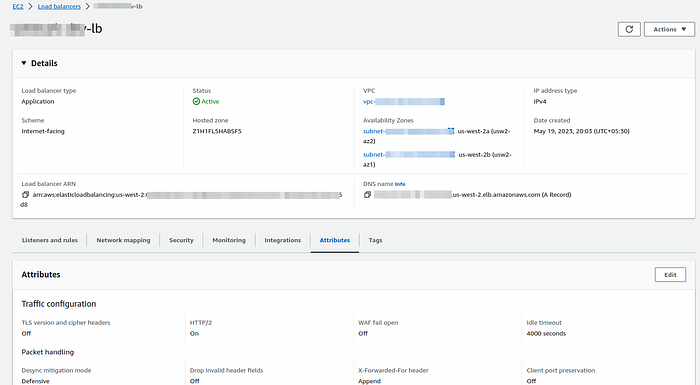
Step-8 :- Navigate to #Ec2 service and check whether u r able to see the load balancer gets created with an Idle Timeout attribute of 4000 as shown like below.

Source-code :- “github.com/MahiraTechnology/Mahira-medium.git”
Conclusion :-
Effective load balancer management is key to maintaining the performance and availability of your applications. With #Terragrunt, you can easily update the idle timeout attribute for your #AWS load balancers, ensuring they align with your application’s specific requirements. By following the steps outlined in this guide, you’ve empowered yourself to make fine-grained adjustments to your load balancer settings, enhancing the overall user experience and optimizing resource utilization. Stay proactive in managing your cloud infrastructure, and you’ll be better prepared to meet the evolving needs of your applications and users.
