Mastering EC2 Deployments with AWS CloudFormation: A Comprehensive Guide with Application Load Balancer Integration

Introduction :-
CloudFormation is a powerful service offered by #Amazon Web Services (AWS) that allows you to define and provision #infrastructure as code. This #AWS CloudFormation template is an example of how you can use CloudFormation to create a complete AWS environment for hosting a web application. The template is written in YAML and defines various AWS resources, including a #Virtual Private Cloud (VPC), a subnet, an #Application Load Balancer (ALB), a #security group, and an #EC2 instance. By utilizing this template, you can automate the deployment of your infrastructure and make it easier to manage and scale your application.
CloudFormation template written in #AWS CloudFormation YAML format. It defines the infrastructure for creating an #Amazon Elastic #Compute Cloud (EC2) instance with an #Application Load Balancer (ALB), a listener, a target group, and associated resources in an #Amazon Virtual Private Cloud (VPC).
Here is a breakdown of the key components in this template:
Parameters: These allow you to input values at the time of stack creation.
KeyName: A parameter for specifying the name of an existing #EC2 KeyPair to enable #SSH access to the EC2 instance.
Resources: These are the #AWS resources that the template creates.
MyVPC: Defines a #Virtual Private Cloud (VPC) with specific properties.MySubnet: Defines a subnet in the #VPC.MyALB: Creates an #Application Load Balancer.MyTargetGroup: Defines a target group for the ALB.MyListener: Configures a listener for the #ALB.MySecurityGroup: Sets up a security group for the #EC2 instance, allowing SSH and HTTP traffic.MyEC2Instance: Launches an #EC2 instance. Note that you need to replace<Your_AMI_ID>with the actual Amazon Machine Image (AMI) ID you want to use.
Outputs: This section specifies what information is returned after the stack creation.
URL: Provides the DNS name of the ALB as an output.
You can use this #CloudFormation template to create the described infrastructure on #AWS. Make sure to provide the necessary values for parameters and replace <Your_AMI_ID> with a valid #AMI ID. This template will set up a simple web server (Apache HTTP Server) on the #EC2 instance and route traffic through the #ALB.
Deployment Steps
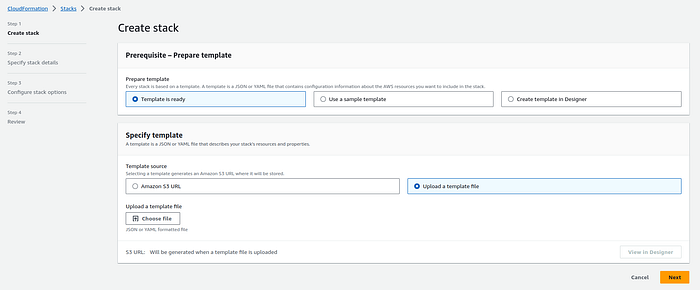
Follow these steps to upload and create the CloudFormation stack using the #AWS Management Console:
- Sign in to the AWS Management Console: Log in to your #AWS account if you haven’t already.
2. Navigate to #CloudFormation: Go to the #AWS CloudFormation service from the #AWS Management Console.
3. Click the “Create stack” button.
4. Upload the #CloudFormation template file (YAML).

Yaml :
AWSTemplateFormatVersion: "2010-09-09"
Description: CloudFormation template for creating an EC2 instance with ALB, listener, and target group.

Parameters:
  KeyName:
    Description: Name of an existing EC2 KeyPair to enable SSH access to the EC2 instance.
    Type: AWS::EC2::KeyPair::KeyName
    ConstraintDescription: Must be the name of an existing EC2 KeyPair.

Resources:
  MyVPC:
    Type: AWS::EC2::VPC
    Properties:
      CidrBlock: "10.0.0.0/16"
      EnableDnsSupport: true
      EnableDnsHostnames: true

  MySubnet:
    Type: AWS::EC2::Subnet
    Properties:
      VpcId:
        Fn::Ref: MyVPC
      CidrBlock: "10.0.0.0/24"
      AvailabilityZone: "us-east-1a"

  MyALB:
    Type: AWS::ElasticLoadBalancingV2::LoadBalancer
    Properties:
      Name: MyALB
      Subnets:
        - Ref: MySubnet
      Scheme: internet-facing
      LoadBalancerAttributes:
        - Key: idle_timeout.timeout_seconds
          Value: "60"

  MyTargetGroup:
    Type: AWS::ElasticLoadBalancingV2::TargetGroup
    Properties:
      Name: MyTargetGroup
      Protocol: HTTP
      Port: 80
      VpcId:
        Fn::Ref: MyVPC
      HealthCheckIntervalSeconds: 30
      HealthCheckProtocol: HTTP
      HealthCheckPath: /index.html
      HealthCheckPort: traffic-port
      Matcher:
        HttpCode: 200

  MyListener:
    Type: AWS::ElasticLoadBalancingV2::Listener
    Properties:
      DefaultActions:
        - Type: fixed-response
          FixedResponseConfig:
            ContentType: text/plain
            StatusCode: 200
      LoadBalancerArn:
        Fn::Ref: MyALB
      Port: 80
      Protocol: HTTP

  MySecurityGroup:
    Type: AWS::EC2::SecurityGroup
    Properties:
      GroupDescription: Enable HTTP and SSH access
      VpcId:
        Fn::Ref: MyVPC
      SecurityGroupIngress:
        - CidrIp: 0.0.0.0/0
          FromPort: 22
          IpProtocol: tcp
          ToPort: 22
        - CidrIp: 0.0.0.0/0
          FromPort: 80
          IpProtocol: tcp
          ToPort: 80

  MyEC2Instance:
    Type: AWS::EC2::Instance
    Properties:
      InstanceType: t2.micro
      SecurityGroups:
        - Fn::Ref: MySecurityGroup
      KeyName:
        Fn::Ref: KeyName
      ImageId: <Your_AMI_ID>
      SubnetId:
        Ref: MySubnet
      UserData:
        Fn::Base64:
          Fn::Sub: |
            #!/bin/bash -xe
            yum update -y
            yum install -y httpd
            systemctl start httpd
            systemctl enable httpd
            echo "Hello, World!" > /var/www/html/index.html

Outputs:
  URL:
    Description: The URL of the ALB.
    Value:
      Fn::GetAtt:
        - MyALB
        - DNSName
Enter a Stack name for your deployment.
Provide parameter values as needed.
Review and acknowledge the capabilities .
You can set additional stack options or tags if necessary.
6. Review and Create:
Review the stack details and configuration.
Click “Create stack” to initiate the deployment.
7. Monitor Stack Creation:
The CloudFormation stack creation process will begin.
Monitor the stack events in the #AWS Management Console.
Conclusion:-
#CloudFormation template serves as a blueprint for provisioning a web application environment in #AWS. It encapsulates best practices by defining the network architecture, security policies, and the #application server configuration. By using this template, you can reduce manual tasks, ensure consistency in your #deployments, and make it easier to manage and scale your application #infrastructure. #AWS CloudFormation enables you to create and manage resources with ease, and this template is just one example of its capabilities in automating and streamlining the provisioning of #AWS resources
