Setting Up Argo Rollouts on Minikube: A Step-by-Step Guide


OverView :-
Argo Rollouts is a #Kubernetes controller and set of CRDs (Custom Resource Definitions) which provide advanced deployment capabilities such as blue-green, canary, and progressive rollouts. It allows users to easily automate and manage the deployment of new versions of their applications, with features such as automated analysis of rollout success/failure and automatic rollbacks. Overall, Argo Rollouts is a powerful tool for ensuring the reliability and availability of applications running on #Kubernetes clusters.
Prerequisite : -
Below are listed the requirements to run this demo
#Minikube installed (see here for official minikube documentation)
Enable Nginx ingress controller on #Minikube
Argo Rollouts controller installed in the cluster
Argo CLI plugin to control the deployment process
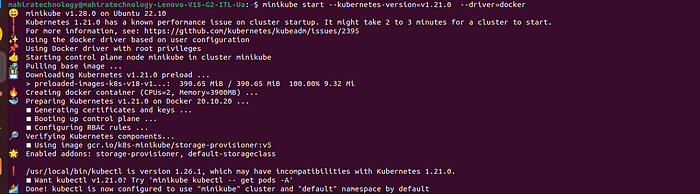
First of all we have to start a new cluster using inikube. We will use version #M1.21in order to be compatible with the nginx ingress #Kubernetes manifest used for this demo.
minikube start --kubernetes-version=v1.21.0 --driver=docker
We need to enable the Ingress controller on our #Minikube cluster by running below command:
minikube addons enable ingress

Next we have to add the cluster ip to Machine’s hosts file, to find the cluster ip you can simply run the following command :
kubectl cluster-info

Now we can configure the machine hosts file with a cluster ip. To do this copy the cluster ip and paste it in the system hosts file as shown in below
#sudo vi /etc/hosts and add the line below
192.168.49.2  rollouts-demo.local
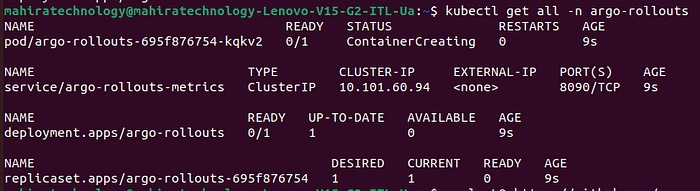
Once the cluster is up we can setup the argo rollouts controller. Basically we need to define custom Argo Rollouts resources that will be used later to describe the deployment process as shown below.
kubectl create namespace argo-rollouts
kubectl apply -n argo-rollouts -f https://github.com/argoproj/argo-rollouts/releases/latest/download/install.yaml

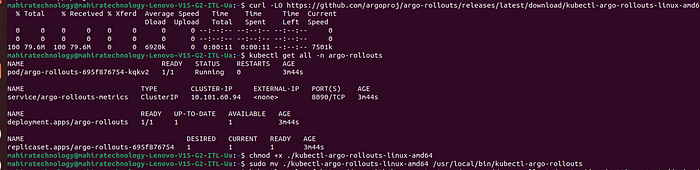
The result of the above command will be inspected by following command as shown below -
kubectl get all -n argo-rollouts
The plugin is considered optional, but it will be used for this demo basically because it provides two ways to control the deployment process, via CLI or exposing a Web GUI.
This is the script to download the plugin for linux -
curl -LO https://github.com/argoproj/argo-rollouts/releases/latest/download/kubectl-argo-rollouts-linux-amd64
Once downloaded, let’s make configure it for the shell as shown in below -
chmod +x ./kubectl-argo-rollouts-linux-amd64
sudo mv ./kubectl-argo-rollouts-linux-amd64 /usr/local/bin/kubectl-argo-rollouts
Ok we’re now ready to show Argo Rollouts in action! We need to create the proper #Kubernetes resources to configure our canary deployment.
Define the deployment declaratively
We’re going to define our deployment process as a #Kubernetes manifest custom resource. use the below command to define the deployment file -
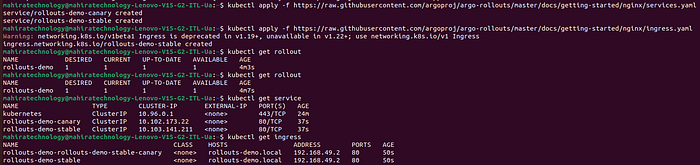
kubectl apply -f https://raw.githubusercontent.com/argoproj/argo-rollouts/master/docs/getting-started/nginx/rollout.yaml
and Also add two services and the ingress resources with the below commands -
kubectl apply -f https://raw.githubusercontent.com/argoproj/argo-rollouts/master/docs/getting-started/nginx/services.yaml
kubectl apply -f https://raw.githubusercontent.com/argoproj/argo-rollouts/master/docs/getting-started/nginx/ingress.yaml
The result the commands should look like this -
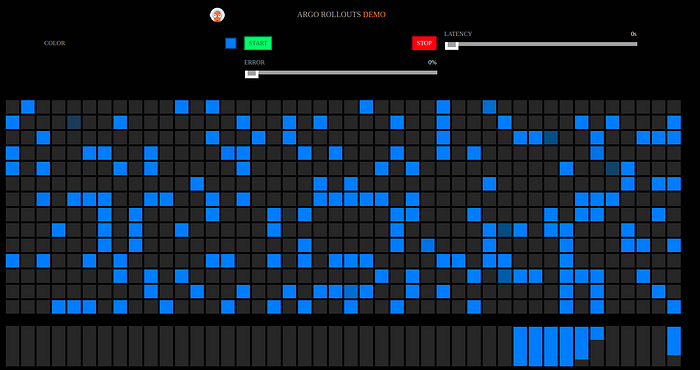
Open your browser and connect through our ingress to the application we defined in our rollout manifest.The hostname is specified in the Nginx ingress resource. Copy the below hostname and paste in your browser
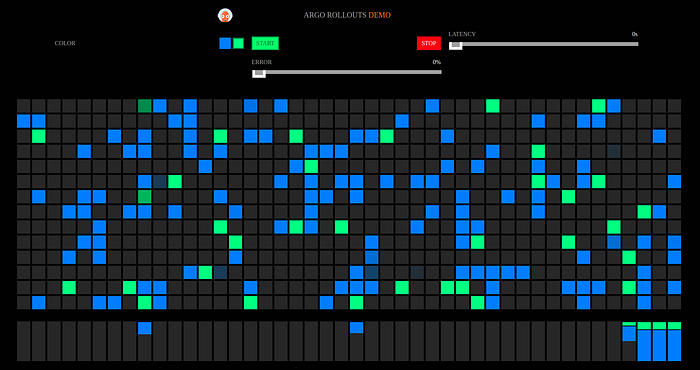
You can see the bluegreen deployments in your browser as shown in the below picture -
Now everything is ready to execute a canary rollout!For this demo we will use the web GUI by simply running the following command that will output the location of the Argo Rollouts Dashboard.
Run the command for Argo Rollout dashboard and Click on the dashboard link which u will get when u run the rollout command -
kubectl-argo-rollouts dashboard
INFO[0000] Argo Rollouts Dashboard is now available at http://localhost:3100/rollouts
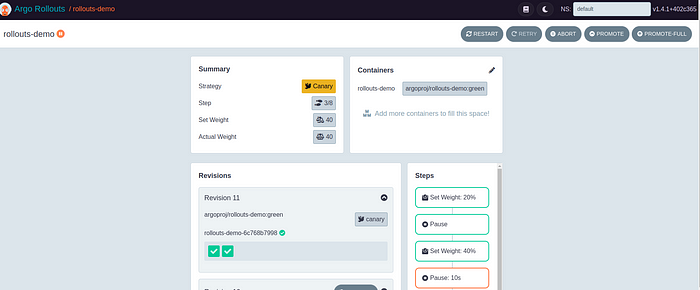
you can see the Argo Rollout dashboard in your browser as shown below and now and click on search bar and select rollout (our rollout name is rollout-demo) and the namespace we are using in the dashboard is default -
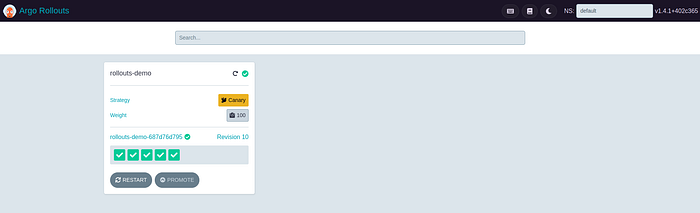
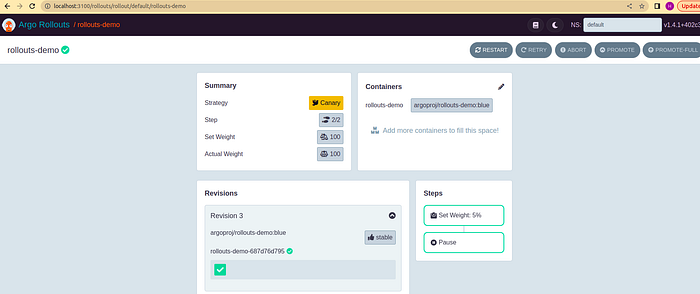
We can click on the rollout box to see the rollout details we’ve defined inside the rollout manifest file and then update the service in the containers section from argoproj/rollouts-demo:blue to the new version of the applicationargoproj/rollouts-demo:green
Once we confirm, the rollout will start and after some seconds the rollout is paused as specified in the rollout steps inside the rollout manifest (See the box with states in the picture with a red box). In this moment we have 20% of the traffic flowing through the canary service and the rest flowing on the original stable one.

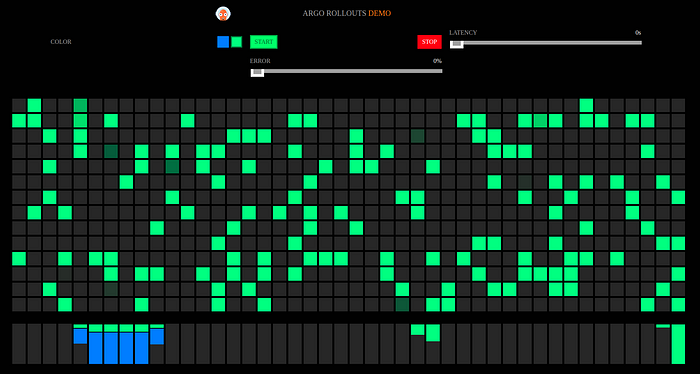
If we go back to the application inside the browser we notice the 20% of the traffic visible as a green area in the bar as shown in below picture -
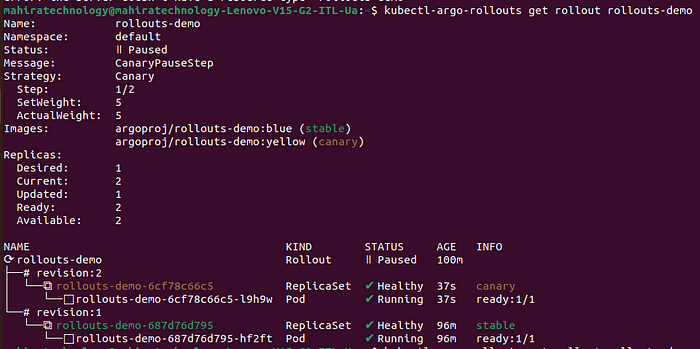
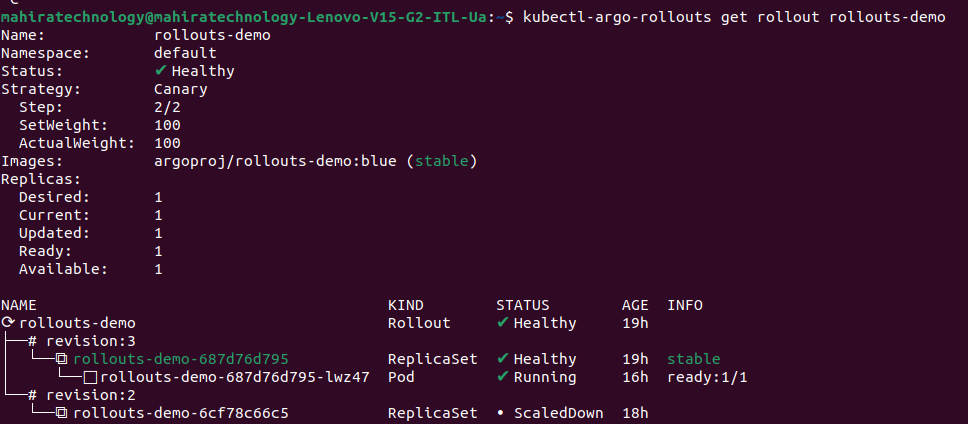
To better understand what is going on under the hood we can run the following argo rollout plugin command and figure out that different replica set and pod are involved for the canary service receiving 20% of the traffic — command is given below
kubectl-argo-rollouts get rollout rollouts-demo
Finish the deployment
At this point, we have two options:
proceed to move 100% of the traffic on the new service
rollback the deployment to the previous service (blue)
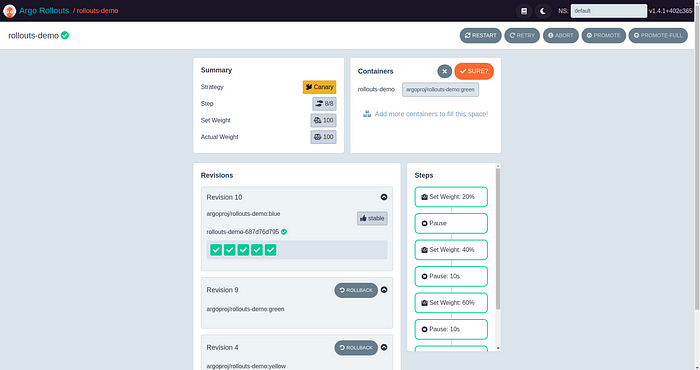
To proceed we can click on the promote or promote-full button in order to complete the deployment, moving 100% of the traffic to the new yellow service. In this case the result would be the same for both buttons but the first one could be useful in case the steps in the deployment has multiple stages, like a middle canary stage with 50% weight. The promote-full would instead skip every middle stage to reach 100% on the new service directly.
click on the promote button shown in the below picture to get 100% green deployment —
once go to the browser and check the green deployment, in the browser we can have a visual representation that 100% of the traffic is now on the green service.
We can even run again the CLI plugin command to see the resource state and figure out that the old pods is automatically destroyed and the new replica set was marked as stable.
Conclusion :-
In this demo we have seen how Argo Rollouts can be adopted to introduce well defined procedures for a deployment process. A manual canary deployment can turn into a well defined resource that lives in a repository and can be configured in the way we expect it to work with a clear set of steps that reduce human error and improve the whole reliability of the process.