The Secret Weapon for DevOps Success: Creating an Application in Argo CD Using Terraform

Overview :-
In today’s fast-paced world of software development, DevOps practices have become essential for organizations to deliver high-quality applications quickly and efficiently. One powerful combination that has gained popularity among DevOps teams is the use of Argo CD and Terraform. This blog post will guide you through the process of creating an application in Argo CD using Terraform, a method that can significantly improve your DevOps workflow.
Argo CD is a declarative, GitOps continuous delivery tool for Kubernetes, while Terraform is an infrastructure-as-code tool that allows you to define and provision infrastructure resources. By combining these two technologies, you can automate the deployment and management of your applications in a Kubernetes environment, making your DevOps processes more efficient and reliable.
Prerequisites :-
Before we dive into the procedure, make sure you have the following prerequisites in place:
A Kubernetes cluster
Argo CD installed on your cluster
Terraform installed on your local machine
Basic knowledge of Kubernetes, Argo CD, and Terraform
A Git repository to store your application manifests and Terraform configuration
Having these elements ready will ensure a smooth experience as we go through the steps of creating an application in Argo CD using Terraform.
Procedure :-
Let’s break down the process into manageable steps:
Step 1: Set up your Terraform configuration
- Create a new directory for your Terraform configuration:
mkdir argocd-app-terraform
cd argocd-app-terraform
- Create a
main.tffile with the following content:
data "aws_eks_cluster" "default" {
  name = "mahira-eks-cluster"
}

data "aws_eks_cluster_auth" "default" {
  name = "mahira-eks-cluster"
}

provider "kubernetes" {
  host                   = data.aws_eks_cluster.default.endpoint
  cluster_ca_certificate = base64decode(data.aws_eks_cluster.default.certificate_authority.0.data)
  token                  = data.aws_eks_cluster_auth.default.token
}

resource "kubernetes_manifest" "mahira_app" {
  manifest = {
    "apiVersion" = "argoproj.io/v1alpha1"
    "kind" = "Application"
    "metadata" = {
      "finalizers" = [
        "resources-finalizer.argocd.argoproj.io",
      ]
      "name" = "mahira-k8s"
      "namespace" = "argocd"
    }
    "spec" = {
      "destination" = {
        "namespace" = "default"
        "server" = "https://kubernetes.default.svc"
      }
      "project" = "mahira-app"
      "source" = {
        "path" = "bases/mahira-app"
        "repoURL" = "https://github.com/MahiraTechnology/mahira-k8s.git"
        "targetRevision" = "HEAD"
      }
    }
  }
}

resource "kubernetes_manifest" "mahira_project" {
  manifest = {
    "apiVersion" = "argoproj.io/v1alpha1"
    "kind" = "AppProject"
    "metadata" = {
      "finalizers" = [
        "resources-finalizer.argocd.argoproj.io",
      ]
      "name" = "mahira-project"
      "namespace" = "argocd"
    }
    "spec" = {
      "clusterResourceWhitelist" = [
        {
          "group" = "*"
          "kind" = "*"
        },
      ]
      "description" = "mahira Project"
      "destinations" = [
        {
          "namespace" = "default"
          "server" = "https://kubernetes.default.svc"
        },
      ]
      "namespaceResourceBlacklist" = []
      "namespaceResourceWhitelist" = [
        {
          "group" = "*"
          "kind" = "*"
        },
      ]
      "roles" = [{
        "name" = "admin"
        "policies" = [
           "p, proj:mahira-app:admin, applications, create, mahira-app/*, allow",
           "p, proj:mahira-app:admin, applications, update, mahira-app/*, allow",
           "p, proj:mahira-app:admin, applications, delete, mahira-app/*, allow",
        ]
      },
      ]
      "sourceRepos" = [
        "*",
      ]
    }
  }
}
2. Create a provider.tf file with following content.
terraform {
  required_providers {
    kubernetes = {
      source = "hashicorp/kubernetes"
      version = "2.32.0"
    }
  }
}
Make sure to replace argocd.example.com:443 with your Argo CD server address, your-argocd-auth-token with your actual Argo CD authentication token, and update the repo_url to point to your application's Git repository.
Step 2: Initialize and apply Terraform configuration
- Initialize Terraform:
terraform init
- Review the planned changes:
terraform plan
- Apply the configuration:
terraform apply
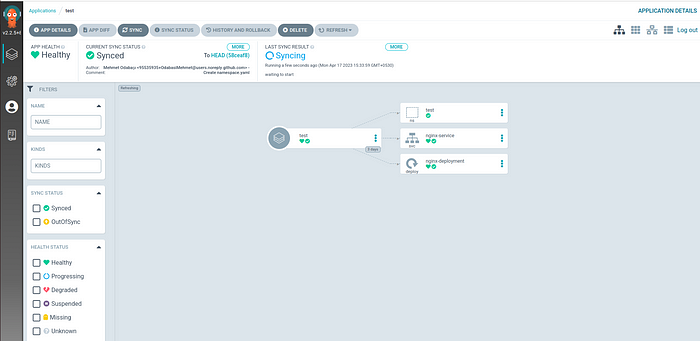
Step 3: Verify the application in Argo CD
Log in to your Argo CD web interface.
Navigate to the Applications page.
You should see your newly created application “mahira-app” listed.
Click on the application to view its details and sync status.
Step 4: Make changes and update the application
Make changes to your application code or Kubernetes manifests in your Git repository.
Commit and push the changes to the main branch.
Argo CD will automatically detect the changes and sync the application.

Conclusion :-
By adopting this method, you can improve your DevOps workflow, increase efficiency, and maintain better control over your application deployments. As you become more comfortable with this approach, you can explore more advanced features of both Argo CD and Terraform to further enhance your DevOps practices.
Remember, the key to success in DevOps is continuous learning and improvement. Keep exploring new tools and techniques to stay ahead in the ever-evolving world of software development and operations.