
Unlock the Power of Infrastructure as Code: How to Effortlessly Create Stages in AWS API-Gateway with Terraform


Introduction :-
Infrastructure as Code (IaC) has made setting up and managing cloud resources much easier. It allows people to manage their cloud resources with the help of code instead of doing manual work in the cloud service’s graphical interface. AWS API Gateway helps manage APIs for applications. One of the key features of API Gateway is the ability to create stages for different environments (like development, testing, and production). Terraform, an IaC tool developed by HashiCorp, can manage AWS resources effortlessly, including creating stages in AWS API Gateway. This document guides you through creating stages in AWS API-Gateway using Terraform.
Steps for Creating Stages in AWS API\-Gateway with Terraform
Setting up Terraform
First, you need to set up Terraform on your computer. Download it from the Terraform website and install it following the instructions. Make sure Terraform can talk to AWS by setting up your AWS access keys securely. You can do this by configuring your AWS CLI or setting environment variables directly for Terraform.
Understanding the API Gateway Resource
To work with AWS API Gateway in Terraform, you need to know about the specific resources Terraform uses to manage API Gateway. The primary resource is aws_api_gateway_rest_api, which represents your API in AWS. For deploying an API in different stages, we focus on aws_api_gateway_deployment and aws_api_gateway_stage.
Creating a Stage
Define Your API
Start by defining your REST API using the aws_api_gateway_rest_api resource. This step involves naming your API and setting up other basic details.
resource "aws_api_gateway_rest_api" "MyAPI" {
 name = "MyAPI"
 description = "My API for demonstration"
}
#### Deploy Your API
resource "aws_api_gateway_deployment" "example" {
 rest_api_id = aws_api_gateway_rest_api.MyAPI.id
 # Note: Stages are managed separately
 stage_name = ""
}
#### Create the Stage
With your API defined and deployed, you now create a stage. This is done using aws_api_gateway_stage. Here, you specify the deployment you just created and configure stage-specific settings.
resource "aws_api_gateway_stage" "example" {
 stage_name = "dev"
 rest_api_id = aws_api_gateway_rest_api.MyAPI.id
 deployment_id = aws_api_gateway_deployment.example.id
}
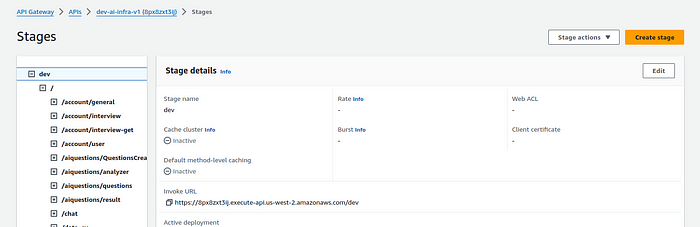
Verifying Your Stage
After applying your Terraform configuration, go to the AWS Management Console, navigate to API Gateway, and then to your API. You should see your new stage listed there. You can also invoke your API using the stage’s URL to verify that it’s working as expected.
Conclusion :-
Creating stages in AWS API Gateway using Terraform lets you manage your API lifecycle effortlessly. By following the steps outlined, you can automate stage creation, making it easier to manage different environments for your application. Terraform’s infrastructure as code approach streamlines cloud resources management, making your development process more efficient.
This guide walked you through setting up Terraform, understanding the necessary AWS API Gateway resources, creating a stage, and verifying its creation. Adopting these practices will help simplify managing your cloud resources, leaving you more time to focus on developing great applications.